Gauntlet2D
Unreal Port Finale: Putting a bow on it.
Introduction:
If you haven't read any of my other posts and are curious about what I'm doing you can check them out here:
- Unreal Port P1: Textures and Tiles and Flipbooks, Oh My!! - Project setup/importing and setting up textures, sprites, and tiles.
- Unreal Port P2: Keep it moving! - Setting character movement and Animation Blueprints.
- Unreal Port P3: It's Alive! - Creating the Enemy and implementing combat between the player and the enemy.
- Unreal Port P4: Full Circle - Finishing up the gameplay loop with pickups, keeping score, and spawning enemies/pickups
- Unreal Port P5: What's on the Menu? - Setting up the UI and Main Menu
This final short post will be about wrapping up the game with some polish.
Disclaimer: I'm fairly new Unreal and have only been learning game dev for about a year now so there may actually be easier solutions to problems I document. Feel free to let me know so that I can continue to learn!
Game Intro and Fade in/out:
I honestly thought this was going to be more difficult, but I found a really good little tutorial to handle this:
Fade In/Out Widget - Unreal Engine 5 Tutorial
Basically:
- Created a new UserWidget with the opening text on a black background
- Add a black image across the entire screen
- Create an animation in the Intro widget called fade in that track the black image's opacity
- create a key frame at about 1 second and set the opacity to 1 at 0 seconds and 0 at the one second mark.
- Follow steps 3 and 4 for the fade out except start with 0 at 0 seconds and 1 at the one second mark.
After creating the animations, I went into my Menu level blueprint and instead of creating the Menu widget right away I set it to open up the Intro widget:

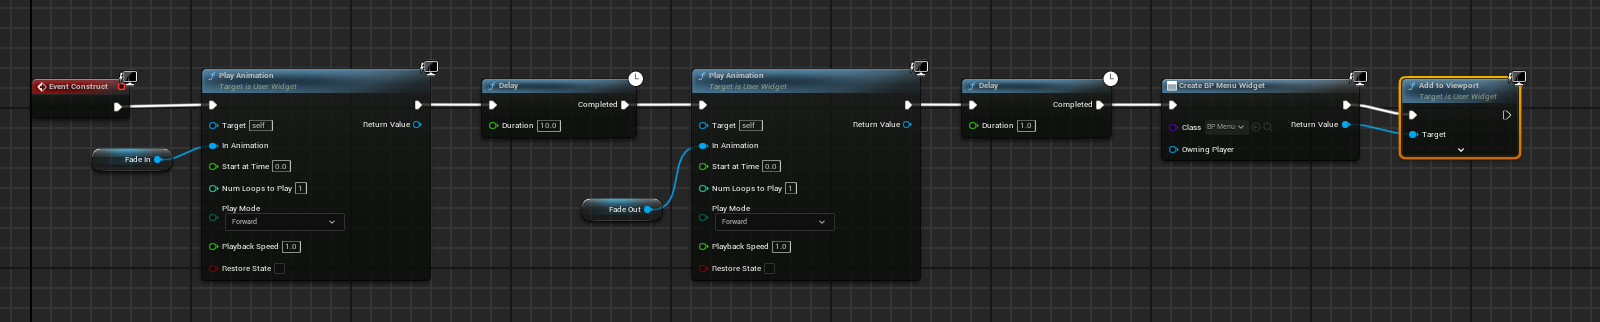
I handle playing the entire intro in the Intro widget's event graph which opens up the main menu widget once the intro is finished playing. It plays the fade in for one second, keeps the intro up for 10 seconds, plays the fade out, and creates the menu widget to display on the viewport:
I also added a short fade in to the Player HUD widget so it looks good when transitioning into the main game.
Final Changes:
Just a tiny list of changes I made to the final game:
- I made the game a little easier and the player a little slower in the Unreal game. The Unity game's player character felt a bit floaty to me.
- I added the player's comrades as decorations like to match the original game.
- My brother played and found a bug where sometimes waves stop spawning. I think I've fixed this, but not 100% sure.
Conclusion:
That's it I'm done! I'm uploading the Unreal build to the Gauntlet 2D page for those who care to try it.
Porting my Unity game has taught me so much about Unreal and about game dev in general. Writing it all down here has helped me re-enforce that learning as well, but the devlogs do take a bunch of time and effort. This series was definitely worth doing the first time around, but I think if I'd do them again it would be once in a while to keep track of what I'm doing overall and not a play by play of everything I do for a game.
What's next for me? I'm going to keep learning Unreal Engine and specifically 2D in Unreal because I think it's fun and there is still so much to learn. I think for my next 5 or so projects I'll try to recreate some arcade cabinet classics that I really love. Not full-on games, but more like vertical slices of each game; maybe a level or two. The first one I'm thinking of is the Mario Brother's arcade game (not the side scroller). Maybe I'll write a devlog or two along the way!
Farewell Gauntlet, I loved making you, but 2 times is enough time to move on!
Comments
Log in with itch.io to leave a comment.
Once again it's a pleasure to read, great documentation and stylish writing.
It was a blast to play the Unreal version and feel the subtle differences compared to the Unity version.
Great work!